First Day Volunteering!


So Thursday was my first day cleaning out and feeding the Roey chickens! It was a really easy and fun way to start the morning before lectures, it took me less than an hour to do everything. The checklist is very simple. In summary you let the chickens out into the outdoor run, litter pick the coop, collect eggs and top up food and fresh water.  

Unfortunately, the weather was miserable but because the wood chip area of the run is sheltered I could still stay dry while it was raining, so volunteering in the winter is not such a bad idea!  At the moment the hens seem to favour laying their eggs in the brooding box, we think this is because it’s rather cosy and dark so if you catch a hen laying there just leave her and collect the eggs later in the afternoon! Also, don’t panic if you all see a few pink bottoms, autumn is the moulting season so they will be losing their feathers in time for a new, warm, winter coat.

I'm Daisy, If you have any questions please email: pinnd@roehampton.ac.uk 


Growhampton loves Chickens!


Hi everyone, I have some very EGGciting news. I’machickenlover has teamed up with the chickens brought about by the sustainability initiative Growhampton for Roehampton University. From now on with currently 8 hens and 4 chicks of breeds comprising of Marans, Araucana’s, Wyandotte’s and Buff Orpington’s, I will be telling you what exactly is going down with these birds. So you can expect to see soon on this blog about how you can help out and look after these chickens yourself, or learn more about how we are caring for the chooks day to day. But please come and check the chicks out next to Digby Square! 

It’s important to note that although everyone on this blog loves chickens, even they need green grass to live on! Every Thursday students can help harvest freshly grown vegetables as part of Growhampton before it is sold in Digby Square for the Market. I strongly recommend getting involved as this is a great way to meet new people and grow food you can eat! Also, visit The Hive Café, the fresh food is delicious. 

If you like the Growhampton FB page you can see any new events that may interest you.

Soon to Come:
The Daily Routine for the Growhampton Chooks!


Im Daisy, If you have any questions please email: pinnd@roehampton.ac.uk


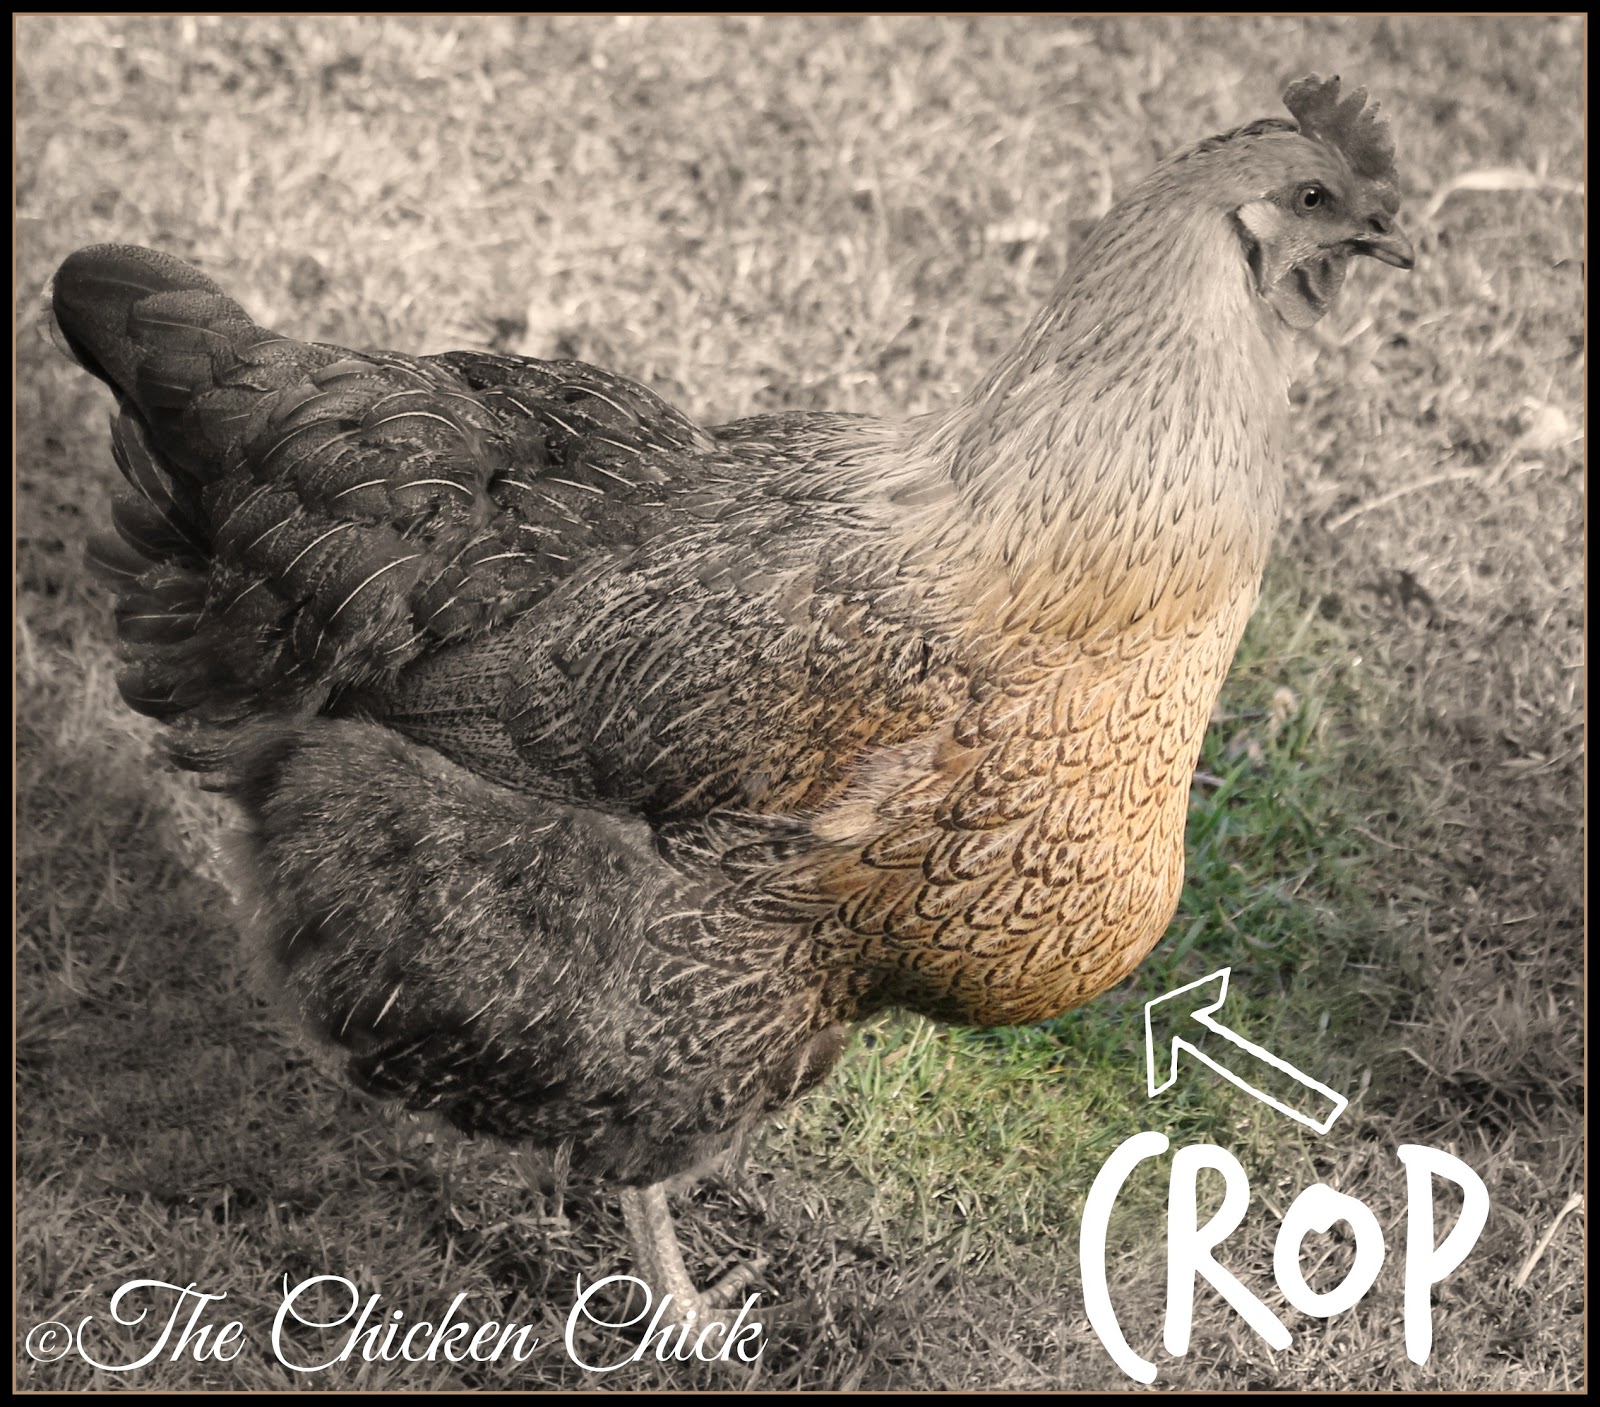
Crop Impaction

The Crop is where any food that a chicken eats is temporarily held so the contents can be moistened and softened. This process happens before food passes in to the first part of the stomach (proventriculus) where enzymes are added. Then the contents are transported to the Ventriculus (often known as Gizzard) where grit and muscular contraction grinds down any substance in to a mush so it can be digested in the intestines. Occasionally, the passage between the crop and the Proventriculus can be blocked often by long grass or string. Birds present symptoms such as loss of appetite, fatigue and most importantly you can feel a solid bulge at the front of the breast. This is when the crop is impacted. Sometimes the passage becomes unblocked in due course however, its best to then take your bird to the vet where they can administer local anaesthetic and inject and cleanse the crop with sterile saline solution.  It is not recommended unless done by a professional to massage the crop while holding the chicken upside down. The act of regurgitating can then block the air passage which may be fatal!

To avoid Crop impaction

- Mow long grass
- Remove any dangers such as plastic or string from reach of your birds
-supply grit, it aids digestion and grinds down food
- General Hygiene in the Coop helps prevent the chance that your chickens catch Marek's disease. Marek's disease is fatal and contagious to chickens and can cause Crop Impaction where the nervous system is affected and its the stomachs failure to contract that stops digestion.


(Visibly enlarged/impacted crop in a hen)

Hatching- Part 2


continued....
Brooding is used to describe a chicks first month of life, this is where you move them to a brooder to develop. Below are some tips to keep your chicks chirping!

- Food dispensers must be low to the ground and readily supplied with chick crumbs and their eating can be encouraged by adding some finely chopped spring onion to the food, remember to also add grit to keep their digestive system working well.

-  Fresh Water should always be available and easy to reach, however, the drinker must be shallow in order to avoid drowning.

- The chicks will naturally rotate themselves under the brooder and they should be able to move away in to a cooler space if they need. By the time the birds reach around 6 weeks old the brooder should be turned down gradually and then eventually turned off to match the outside temperature and harden them up.

- At around the chicks 6 weeks of age you should also gradually add layers pellets to the mash (normally over the course of 2 weeks)  in order to switch them on to their new feed.

- Then the chickens should be ready to be introduced out doors in to a house and run, where the grass should be cut short and free off clippings to avoid compaction in the crop.

Hatching-Part 1


Chicks hatch from their eggs at about 21 days, below are some tips for the future.

- If chicks hatch dry, the humidity of the incubator used was probably too low however, if they come out exceedingly wet the humidity setting was too high.

-It is also important to let them break out the shell themselves as this is a good indicator of their health, once they start pecking through give them up to 24 hours to hatch.

Brooding is used to describe a chicks first month of life, this is where you move them to a brooder to develop.

- Most experienced keepers will use a waterproof and pest-proof shed with an infrared heat lamp, however for domestic purposes a cardboard box with a 60 watt light-bulb suspended (at approx. 40cm) above could also be used.

- The temperature underneath the lamp should be recorded at around 34 Celsius. If the chicks are too hot they will dehydrate and this can be fatal, a sign of this is droppings sticking to their abdomens. Remove these droppings carefully, check the temperature and adjust according to their behaviour.

- You should closely monitor the chicks behaviour to whether the lamp should be lowered or not e.g. huddling would indicate they are cold.

- The floor of the brooder should be covered in wood-shavings 2-3 inches deep

- At first its good to keep the chicks enclosed in a small area using cardboard 'walls' (no higher then 45cm) so they can get comfortable with their surroundings.

- Using additional bits of cardboard on the floor may also help the chicks find their feet on slightly harder ground.

- Remember too much bright light may be stressful and encourage pecking, a red light is a better choice as if there is any blood it will be seen as black thus not as appealing for peckers.

- The room temperature should be about 25 celcius and be gradually reduced to 16 celcius as they approach about 7 weeks.....To be continued

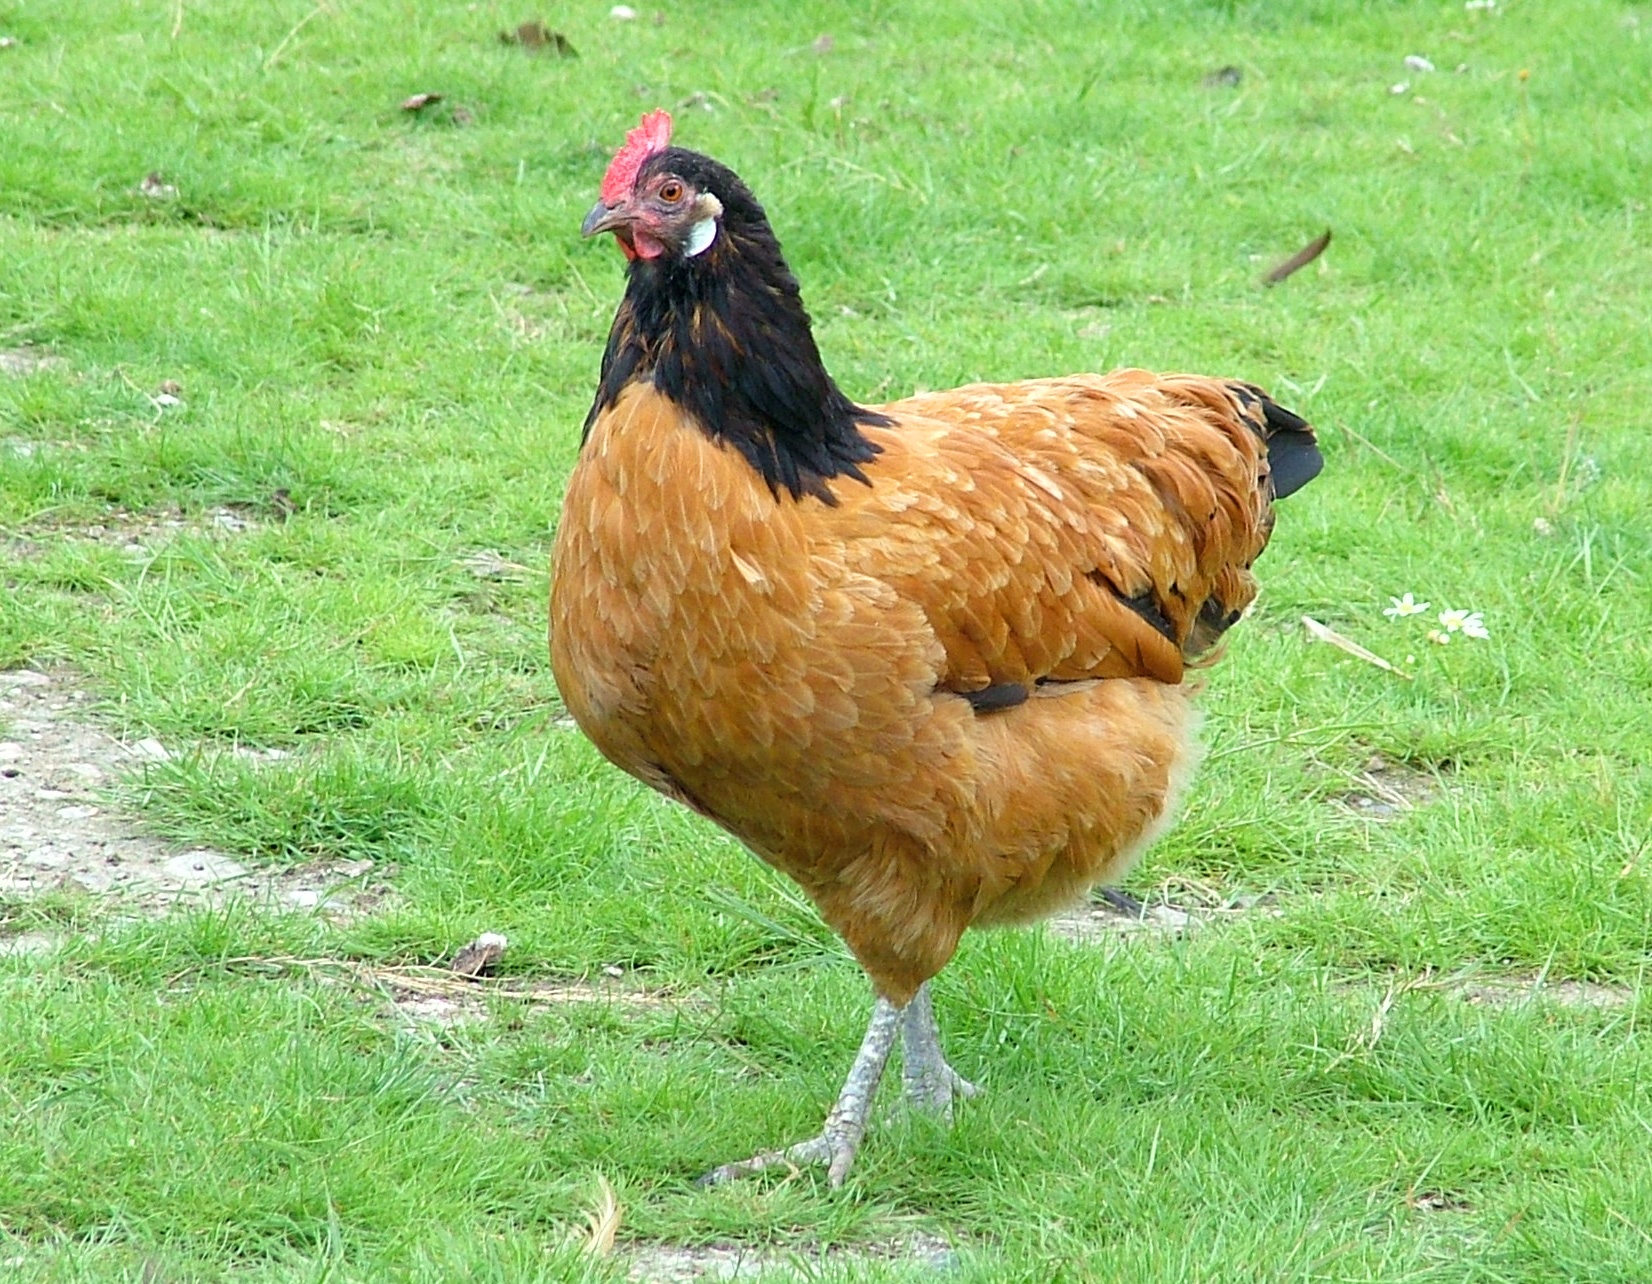
BREED OF THE WEEK - VORWERK

The Vorwerk can be commonly mistaken with the chicken that inspired this rare breed- the Lakvender-both originating from Germany. They have a rugged attitude and are suited to northern temperate climates. Oskar Vorwerk in 1900 set out to introduce this breed as a mild-mannered, economical and practical bird of a darker colour to the Lakvender. Although, their personality can shift to be feisty and flighty. The Vorwerk is a broad well-rounded utility bird with wings tightly held to the body, they should have a single comb with up to 6 serrations with a red face, white ear lobes bright orange eyes. Their necks are covered with full hackle feathers and stand on grey legs with four-toed feet. The neck and tail should have pure black feathers and buff body feathers. These beautiful birds are alert and active suitable for domestic keepers, although, because they are listed as a rare breed, breeders are less likely to sell their best birds. Vorwerks lay cream coloured eggs and are descent layers of about 170 eggs a year and bantam sizes are available.

Summary:
- 170 cream tinted eggs PA
- Varieties- Black and Buff
- Character- Alert, Friendly and Rugged
- weight- Large male 2.8kg, Large female 2.3kg

Grit and Oyster Shell

Grit like for most birds is essential for keeping a chickens digestive system healthy and efficient- it is used to grind down food in the gizzard. Many hens will pick off grit naturally from the earth if they are free range, however, if they are limited to a smaller enclosed environment its a good idea to mix some grit and oyster shell to the feeder or add some to a separate small bowl. While grit aids digestion, oyster shell is a good source of calcium which will make sure the eggshells are hard and not soft. You can buy grit which is mainly granite fragments and crushed oyster shell from most good poultry shops.

BREED OF THE MONTH: POLAND

The Poland is a striking, friendly breed characterised by a large protuberant crest on their heads. They are decent layers (120 eggs a year)  but are mainly kept for exhibition purposes. The horn type comb should be small and hidden by the crest. Apart from the white-crested black variety where the wattles are large and should be seen among with the earlobes, the other varieties should all have abundant muffling (feather coverage) of the face hiding the earlobes and wattles. The crest must be checked often and washed to prevent any parasitic infestations which may lead to problems such as blindness, this also means they are not well suited to mixed flocks as other birds may take advantage of their low visibility. The Poland also requires narrow-lipped feeders in order to help keep the crest feathers clean- pellets rather then mash is recommended as dust can cause eye problems in this vulnerable breed.

Summary:

-120 smallish white shelled eggs PA
- Varieties: Black crested white, Blue, Chamois, Cuckoo and Buff, Gold, Self Black, Self White, Silver, White crested Black and White and Cuckoo
- Character: Friendly
-Weight: Large Fowl Male- 2.95 kg, Large female-2.25 kg

COMING SOON: i'm a budgie !!!!!!

COMING SOON: imabudgielover.blogspot.com


The Chicken Coop Basics!

If you would prefer not to have a plastic chicken coop for cost, repair-ability reasons or  because you want to be traditional- wooden houses are the answer! Wooden coops have a huge variety of shapes, sizes and features. Below are some suggestions of what domestic keepers should look out for when buying.

- Perches should all be at the same height within the coop, remember hens have a fierce pecking order and they will all try and fight for the top perch.

- Its up to you whether you think you will need a run or not. It depends how often you are around to let the hens out into the garden.

- At least some of the run should be in shade, to make sure there is a dry area and to offer some protection for your hens from harsh sun.

- The nesting box should have breathing holes up high to keep the inside well ventilated, there should be one box for at least every three birds which should be around 30cm square and 8-10 inches deep to provide a comfortable sitting of straw.

- Some coops provide a door between coop and run, this may be of use in the winter to keep your hens warm.

-An extra door or liftable roof is needed for cleaning the coop and collecting the eggs.

- Many modern wooden houses have slidable droppings trays underneath the perches for easy cleaning.

- If your coop does have a run, remember unless you have decided to put chippings in there you should move it around to prevent your hens living in poor conditions.

- when I had a wooden coop I copied Omlet's idea off a 'fox-proof run' by securing chicken wire to the ground among the outside of the coop to stop foxes from digging inside.

-Perches should be about 5cm wide with rounded edges for large fowl

-3x3 feet in coop size is suitable for 3-4 birds despite being marketed for up to 6. Remember overcrowding can lead to feather-picking, egg-eating and respiratory problems.